
Defining landing zones
In a Compose project, you can define any number of landing zones. Defining multiple landing zones is necessary if the data that you eventually want to be available in your data mart(s) is located in several different landing zones.
Before you can define a landing zone in Qlik Compose, you first need to define a data warehouse.
For more information on adding data warehouses, see Setting up a data warehouse connection .
To add a landing zone:
-
Open your project and click Manage in the Databases panel.
The Manage Databases window opens.
-
Click the New toolbar button.
The New Data Source window opens.
-
Provide the following information:
Data source fields Field
Description
Content Type
Choose whether the content in the landing zone is Full Load, Change Processing or Full Load and Change Processing (according to the Qlik Replicate task definition).
See also After applying changes below.
Designated By
Select whether the landing zone is a Database or a Schema. This should reflect the target endpoint settings in the Qlik Replicate task.
When Oracle is the Data Warehouse, this field is read-only since the Oracle landing zone is always designated by Schema.
For more information, see Defining a Qlik Replicate task.
Database Name
This field is not applicable when Oracle is the Data Warehouse.
If the landing zone is designated by a Database, specify the database name. This must be the same as the target database defined in the Qlik Replicate task.
When Microsoft Azure Synapse Analytics is the data warehouse, the landing zone database must be the same as the database defined for the data warehouse, although it should use a different schema.
For more information, see Defining a Qlik Replicate task.
Schema Name
If a schema name was specified in the Qlik Replicate task settings, specify the same schema name here.
When Oracle is the Data Warehouse, this must be the same as the schema defined in the Oracle target connection string in the Qlik Replicate task.
For more information, see Defining a Qlik Replicate task.
Error Mart Schema Name
Specify the schema where you want the data mart exception tables to be created. Data that is rejected by data quality rules will be copied to tables in the specified schema.
For more information on error marts, see Defining and managing data quality rules.
After applying changes
Replicate creates Change Tables in the landing zone in which subsequent changes to the original Full Load data are stored. If you selected Change Processing or Full Load and Change Processing as the Content Type, you can determine what to do with the Change Tables after the changes have been applied to the data warehouse tables:
Choose one of the following:
- Delete from Change Tables - Deletes the changes from the Change Tables
-
Keep in Change Tables - Keeps the changes in the Change Tables. This is useful if you do not want all of the changes to be applied at the same time.
For more information, see Working with the Keep in Change Tables option .
- Archive the Change Tables - If you select Archive the Change Tables, you also need to specify a Database name and Schema name in the relevant fields.
Warning noteArchived Change Tables do not contain a record of DDL changes. If DDL changes were applied, you will need to update the archived tables manually.Discover the VARIANT data type as (applies to Snowflake only) As Compose does not support mapping directly to the Snowflake VARIANT data type, you need to choose whether VARIANT columns will be created as JSON (the default) or XML in the Snowflake database. Associate with Replicate Task
Select this to associate your Compose project with the related Replicate task. Replicate tasks replicate the relevant tables from the source database to the landing zone in your data warehouse. Specifying the Replicate task name will enable you to both discover the source tables' primary keys, and monitor and control that task from within Compose.
However, before you can specify a Replicate task name, you first need to define the connection settings to at least one Replicate Server machine. To do this, click the Replicate Server Settings link below the Associate with Replicate task field and then configure the settings as described in Replicate Server settings.
Once you have configured connectivity to at least one Replicate Server, you can then proceed to select a Replicate task.
To select a Replicate task:
-
Click the browse button to the right of the Associate with Replicate task field.
The Select Replicate Task window opens.
-
Select a Replicate Server from the Server drop-down list.
The Replicate Tasks list is populated with all tasks defined on the selected server.
- Select the task that is replicating the source tables to the landing zone and then click OK.
The name of the selected task is shown as read-only in the Associate with Replicate task field.
-
If you want to generate the model by discovering the source database in the Replicate task, leave the New Data Source window open for now as you will need to define connectivity to the source database in the Replicate task.
For instructions on how to do this, see Defining Replicate data source connections.
Otherwise, click OK to save your settings.
Working with the Keep in Change Tables option
When you select the Keep in Change Tables option described earlier, the changes are kept in the Change Tables after they are applied (instead of being deleted or archived). This is useful as it allows you to:
- Use the changes in multiple Compose projects that share the same landing
- Leverage Change Table data across multiple mappings and/or tasks in the same project
-
Preserve the Replicate data for auditing purposes or reprocessing in case of error
-
Reduce cloud data warehouse costs by eliminating the need to delete changes after every ETL execution
To facilitate this functionality, Compose keeps a "watermark" per table as a way of tracking which data has been consumed and which data is yet to be consumed. The watermarks can be reset if needed, as described in Deleting changes and resetting watermarks below.
Use case
I have a table named Inventory in my landing that I would like to load into two separate tables in my data warehouse for the purpose of tracking and analyzing changes. The tracking table needs to be updated every 15 minutes while the analysis table needs to be updated once a day.
To accomplish this, I do the following:
- Set up a connection to my landing zone making sure to select the Keep in Change Tables option.
- Discover the source tables from the landing zone as described in Discovering the Source Database or Landing Zone.
-
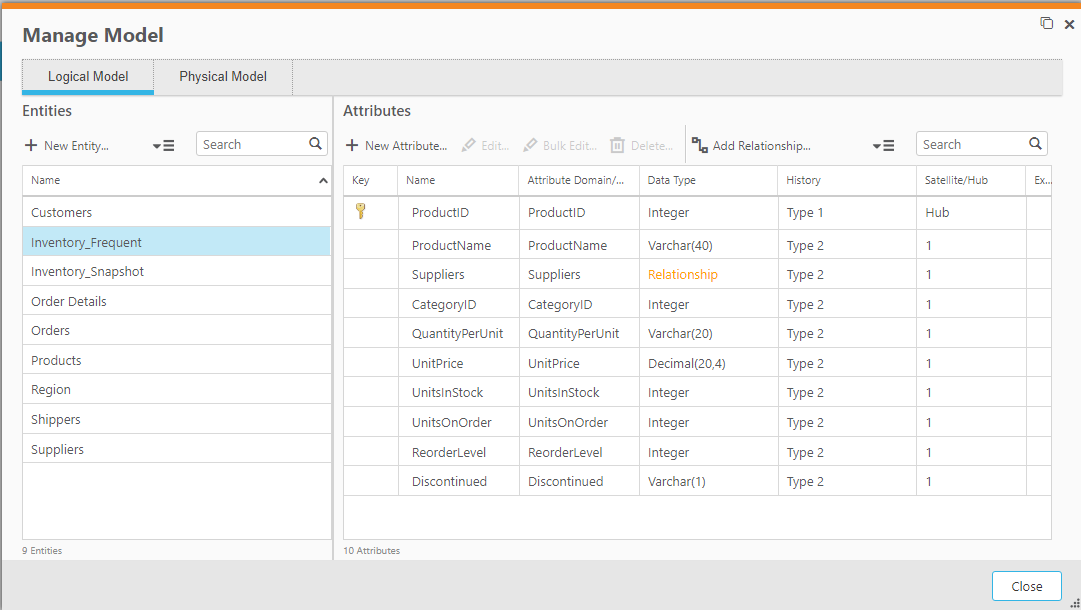
Duplicate the Inventory table in my model so that I have two tables, and then rename the tables as follows: Inventory_Frequent (for tracking) and Inventory_Snapshot (for analytics).
For instructions on how to duplicate entities, see Managing entities
-
Validate the model as described in Validating the model.
-
Create the data warehouse tables as described in Creating the data warehouse tables.
-
Duplicate the Full Load and CDC tasks so that I have one set of tasks that populate and update the Inventory_Frequent table, and another set of tasks that populate and update the Inventory_Snapshot table.
Tip noteMake sure when duplicating the tasks to select Full Load Only as the task type for Full Load tasks and Change Tables Only as the task type for CDC tasks. See also Adding and duplicating tasks. -
Verify the correct mappings are selected and delete any redundant mappings that were created when the tasks were duplicated.
Tip noteFor the source_Frequent and source_Frequent_CDC tasks, the Map_Inventory_Snapshot mapping should not be selected. Conversely, for the source_Snapshot and source_Snapshot_CDC tasks, the Map_Inventory_Frequent mapping should not be selected.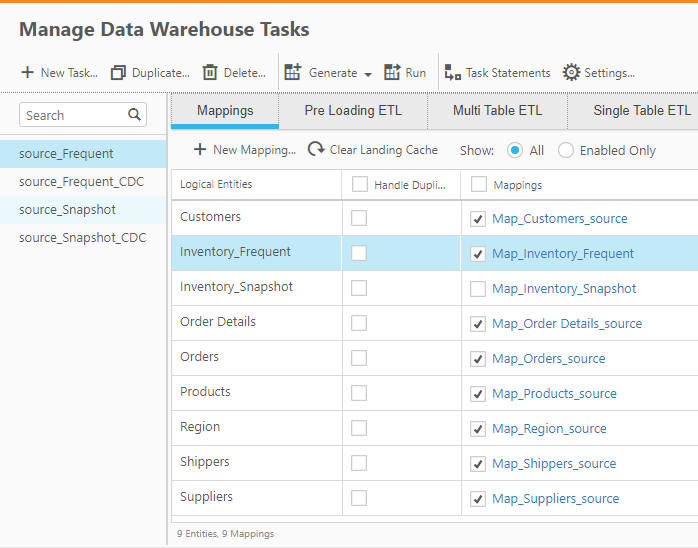
-
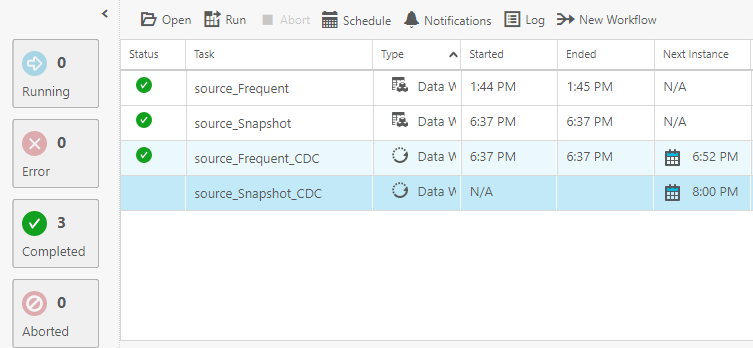
Generate and run the source_Frequent and source_Snapshot Full Load tasks.
-
Generate the source_Frequent_cdc and source_Snapshot_cdc tasks.
-
Schedule the source_Frequent_cdc task to run every 15 minutes and schedule the source_Snapshot_cdc task to run at 20:00 every day.
Deleting changes and resetting watermarks
The following CLI options are available for managing watermarks.
Deleting changes from the Change Tables
You can delete the changes from the Change Tables if they are no longer required. Although this is not required, you might want to incorporate this into your database maintenance plan.
Command syntax
ComposeCli.exe generate_watermark_scripts --project project_name
Where:
--project is the name of the project.
Example
ComposeCli.exe generate_watermark_script --project MyProject
Resetting the watermark
Resetting the watermark might be required if you need to reapply changes from an earlier time period, for example.
Command syntax
ComposeCli.exe reset_watermark --project project_name --landing landing_name [--table table_name]
Parameters
| Parameter | Description |
|---|---|
| --project | The name of the project. |
| --landing |
The name of the landing in Compose containing the Change Tables whose watermarks you want to reset. |
| --table |
The logical name (i.e. without the_ct suffix) of a specific Change Table whose watermark you want to reset. When omitted, watermarks for all Change Tables will be reset. |
Example
ComposeCli.exe reset_watermark --project MyProject --landing northwind_Landing
Limitations and considerations
Switching from Keep in Change Tables to Delete from Change Tables/Archive the Change Tables or vice versa, requires you to regenerate the affected tasks. If you switch from Keep in Change Tables to Delete from Change Tables/Archive the Change Tables, Compose need to re-read the changes and delete/archive the older changes. In such a case, running the CDC tasks might take longer than usual, depending on the amount of changes.